Welcome to my first blog! I’ve been throwing around the idea of it for quite a while and decided to just go for it! I annoy all my friends and family with my Facebook food porn so I thought maybe this was a better avenue. I’ll also have a better archive for my favorite recipes!
I suppose I’ll figure out my style as I delve deeper into this adventure! But for now, I’m just going to put everything together that I have a picture for in November and December (I sure wish I’d taken a picture of the Cheesy Chicken Tortilla soup I made for some friends- I’ll throw the recipe in at the end…).
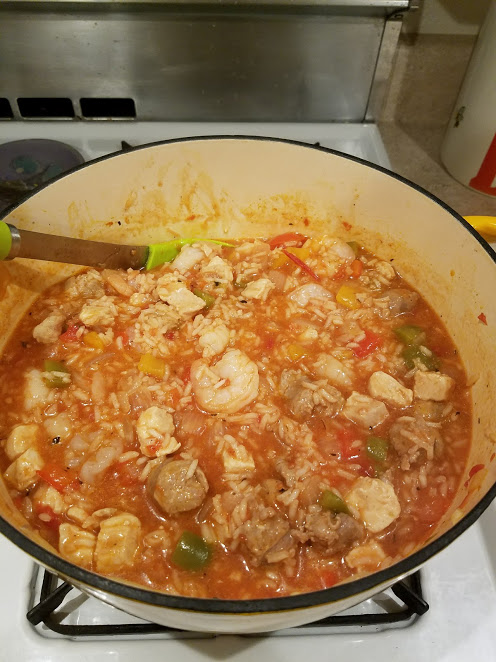
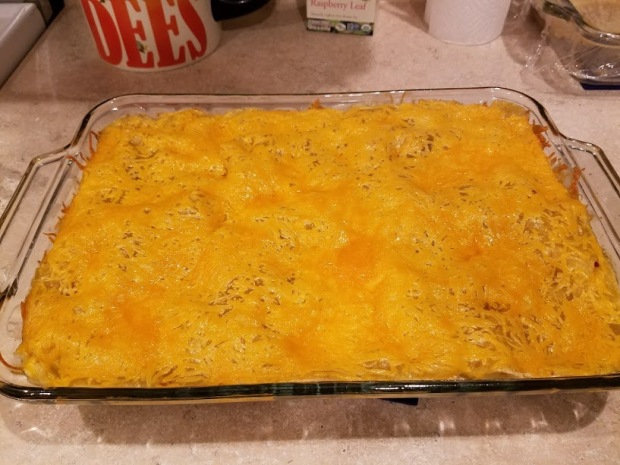
21 Day Fix Jambalaya
I’m forever in a battle of my waistline and delicious food. Last year, I completed 3 (well, 2 1/2) cycles of the 21 Day Fix. What I’ve found is that I do much better when there isn’t a light at the end of the tunnel for which I can gorge myself. I did find some pretty amazing recipes on the journey though!
**This recipe was HOT!!
For my fellow FIXers – I used 1 PURPLE to scoop out each portion and it equals 1 red, 1 green and 1 yellow.
Originally from Gimme Some Oven for Jambalaya 101 and used from http://rachelatyson.blogspot.com.
INGREDIENTS:
- 3 Tbsp. olive oil
- 2 ribs celery, chopped
- 1 white onion, diced
- 1 small red bell pepper, cored and diced
- 1 small yellow bell pepper, cored and diced
- 1 small green bell pepper, cored and diced
- 4 cloves garlic, minced
- 2 boneless skinless chicken breasts, cut into bite-sized pieces
- 1 lb. turkey sausage, thinly sliced into rounds
- 3 cups chicken stock
- 1 (14 oz.) can crushed tomatoes
- 1 1/2 cups uncooked white or brown rice
- 2 Tbsp. Cajun or Creole seasoning (**more/less to taste, see note below)
- 1 bay leaf
- 1 tsp. thyme, crushed
- 1/4 tsp. cayenne pepper
- 1 lb. raw shrimp, peeled and deveined
- salt and pepper
- (optional garnishes: chopped fresh parsley, thinly-sliced green onions, hot sauce)
DIRECTIONS:
Heat 2 tablespoons. olive oil in a large saute pan over medium-high heat. Add celery, onion, bell peppers, and garlic. Saute for about 5 minutes, stirring occasionally, until the vegetables are soft and mostly cooked. Add the remaining tablespoon of olive oil, chicken and sausage, and stir to combine. Continue sauteing for an additional 5 minutes, or until the chicken is no longer pink and mostly cooked.
Add the chicken stock, tomatoes, rice, Cajun spice, bay leaf, thyme, and cayenne, and stir to combine. Reduce heat to medium-low, cover and simmer for about 25-30 minutes, or until the rice is cooked, stirring occasionally. (Don’t forget to stir, or the rice may burn on the bottom of the pan.)
Once the rice is tender, add in the shrimp and stir to combine. Let the mixture continue to simmer, stirring occasionally, until the shrimp are cooked and pink. Remove bay leaf and season the jambalaya with salt and pepper and hot sauce and additional Cajun/Creole seasoning if needed. Remove from heat and serve with optional garnishes if desired.
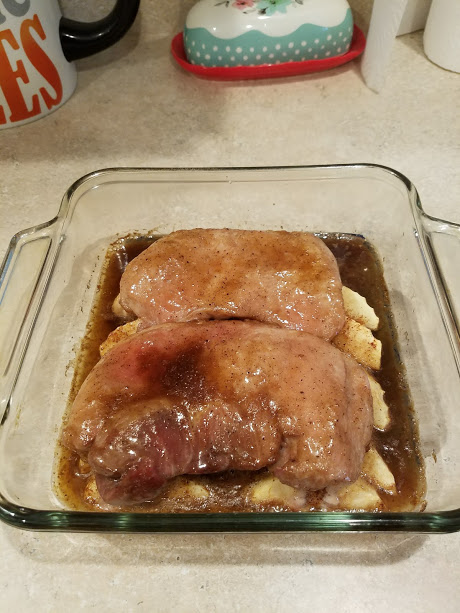
Baked Pork and Apples with Brown Sugar Glaze
It was a chilly weekend afternoon and my hubby wanted a tasty lunch. I had purchased a large amount of boneless pork chops during a sale and had these just laying around. I have to say…I will certainly make these again!!
Author: Wondermom Wannabe
Ingredients:
2 apples, peeled and sliced
4 boneless pork chops salt and pepper (I only had 2 large)
4 T butter
4 T brown sugar
½ tsp cinnamon
½ tsp nutmeg
Instructions
1. Preheat oven to 350°, Layer apples in bottom of casserole dish. Sprinkle with cinnamon.
2. Trim fat from pork chops. Lay on top of apple slices. Sprinkle with salt and pepper.
3. In small saucepan over medium heat, melt butter, brown sugar, cinnamon, and nutmeg, stirring constantly. Pour sauce over the pork chops and apples.
4. Bake uncovered at 350° for 35-40 minutes

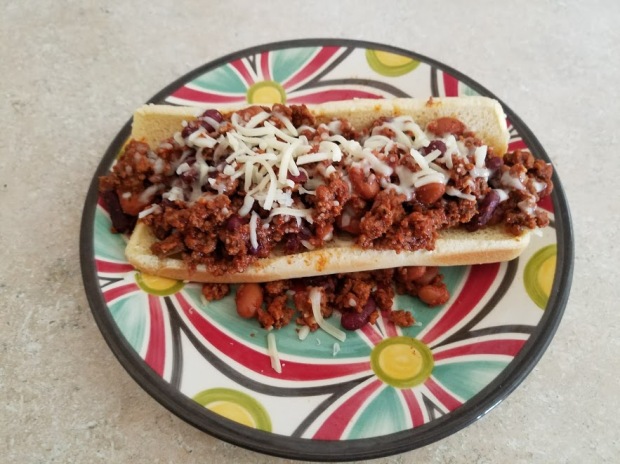
Chicago Dog Pizza
CUBS WIN, CUBS WIN!! HOLY COW!!
So, a local restaurant gave me this idea (I didn’t see that they had this pizza until it was too late!). I’m a huge Cubs fan but in Arizona, we don’t get all of the perks and benefits of Chicago area food. I’d been making my own Chicago dogs for the last month as the Cubs went further and further in their quest for a world series win. I have to say, this pizza was great but was even better cold the next day!!
Ingredients:
1 can Pillsbury Pizza dough (Ok, I could have made my own but I was lazy)
Pizza Sauce
Mozzarella
Tomato
1- 2 Grilled Beer Brats
Pickle Spears (I liked it a little thicker, slices will work too)
Mustard drizzle
Poppy Seeds
Instructions:
For a Crisper Crust
Pre-bake dough for 8-9 minutes. Flip crust with spatula. Top with pizza sauce, cooked meat, cheese and other toppings as desired. Bake 6-10 minutes longer or until crust is deep golden brown.
For Soft Crust
Do not prebake dough. Spread with sauce and top as above. Bake 9-13 minutes for cheese pizza, 13-17 minutes if additional toppings are added, or until crust is deep golden brown.
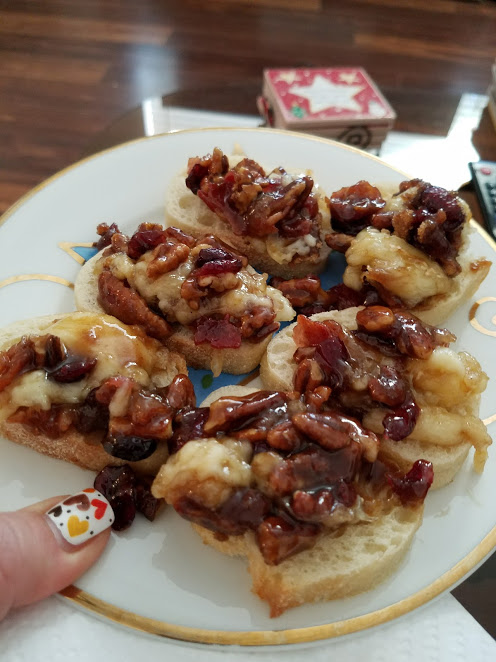
Cranberry and Pecan Baked Brie
Ohh this was pure heaven!! I’d picked up some brie on sale and had some leftover dried cranberries, pecans and crustinies. Warning, this is not diet food!!
INGREDIENTS:
- 1 (8-ounce) wheel brie cheese, rind trimmed
- 2 tablespoons brown sugar, packed
FOR THE MAPLE HONEY DRIZZLE
- 1/4 cup brown sugar, packed
- 2 tablespoons honey
- 2 tablespoons maple syrup
- 1 tablespoon unsalted butter
- 1/4 teaspoon ground cinnamon
- Pinch of nutmeg
- Zest of 1 orange
- 1/2 cup pecan halves, chopped
- 1/4 cup dried cranberries
DIRECTIONS:
- Preheat oven to 350 degrees F.
- Place brie on a rimmed baking sheet or a 5-inch cast iron skillet; sprinkle with brown sugar. Place into oven and bake until softened, about 12-15 minutes; let cool 5 minutes.
- In a small saucepan over medium heat, combine brown sugar, honey, maple syrup, butter, cinnamon, nutmeg and orange zest. Bring to a boil; reduce heat and simmer, stirring occasionally, until foamy, about 1-2 minutes. Stir in pecans and cranberries.
- Serve brie warm topped with pecan mixture; serve with crackers or baguette.
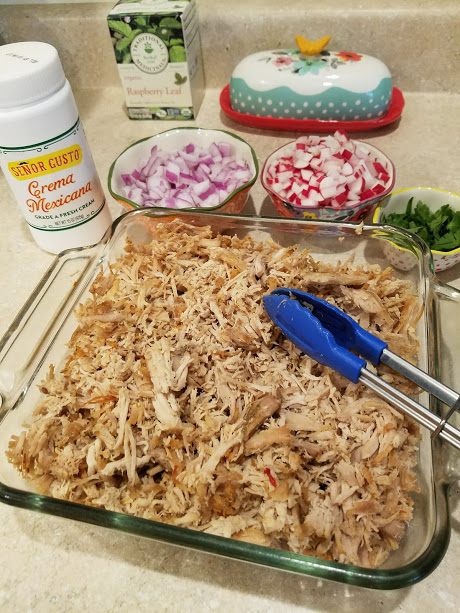
Crockpot Carnitas Street Tacos
I have to give credit to this concoction to my brother and sister-in-law. I’d eaten it at their house in May and now my husband and I are hooked! I’d only used the pulled pork I had left over from my wedding in June so this was a new pulled pork recipe for me (I couldn’t remember how my family had done it). Pinterest came through again!!
The base of the pork recipe comes from http://www.recipetineats.com.
- 5 lb pork shoulder (pork butt), skinless, bone-in (4lb without bone) **I’d found a center cut loin and it worked out just fine!!
- 1 onion, chopped
- 1 jalapeno, deseeded, chopped
- 2½ tsp salt
- 1 tsp black pepper
- 4 cloves garlic, minced
- 2 oranges, juice only (or sub with ¾ cup fresh orange juice)
- 1 tbsp dried oregano
- 2 tsp ground cumin
- 1 tbsp olive oil
- Rinse and dry the pork shoulder, rub in salt and pepper.
- Combine the rub ingredients then rub all over the pork.
- Place the pork in a slow cooker (fat cap up), top with the onion, jalapeño, minced garlic (don’t worry about spreading it) and squeeze over the juice of the orange.
- Cook on low for 8 to 10 hours or on high for 6 hours.
- The meat should be tender and falling off the bone. Remove from the slow cooker and let cool slightly. Then shred the pork using two forks.
- Skim off the fat from the juices remaining in the slow cooker and discard the fat. Then if you are left with a lot more than 1½ to 2 cups of juice, then reduce it (either in the slow cooker on the sauté setting with the lid off, or in a saucepan). The liquid will be SALTY, it is the seasoning for the pork. Set aside.
- After shredding, line a cookie sheet with aluminum foil, put half of the pork on the sheet. Place it in the broiler for 5-7 minutes to crisp it up! Repeat with the other half, then drizzle some of the remaining juice over the meat.
I like to crisp up my corn tortillas by using a large skillet and PAM. I’d already diced the red onion, radishes and cilantro. Load up your tortillas, drizzle some hot sauce and Mexican Crema and prepare your taste buds for a treat!
P.S. This made so much pork I didn’t want it to go bad. I used the remainder for shredded pork burritos. I used a flour tortilla, some leftover refried beans and monterrey jack. Wrapped them up and freezed them. We saved 4 to eat for lunch the next day and used the same toppings as the tacos. Heaven!

Crockpot Green Chile Chicken Enchilada Soup
Prep Time: 10 minutes
Total Time: 10 minutes
Servings: 6 -8
Author: Chelsea at http://www.chelseasmessyapron.com
- 1 can (10 ounces) green enchilada sauce
- 1 can white beans
- 2 cans black beans
- 1 pound boneless skinless chicken thighs or breasts (I was lazy and used preshredded rotisserie chicken from the grocery store)
- 2 cans (4 ounces EACH) diced fire-roasted green chiles
- 1 can (10.5 ounces) diced tomatoes optional
- 4 teaspoons ground chili powder
- 1 tablespoon ground cumin
- 3/4 teaspoon paprika
- 1 teaspoon salt
- 1/4 teaspoon pepper
- 2-3 tablespoons fresh cilantro optional
- 2 cups chicken broth or stock
- 1 package (8 ounces) cream cheese softened
- Pick your favorite add-ins: pepper-jack cheese, sour cream, fresh lime, additional cilantro
Instructions
-
In a large crockpot (I use a 6-quart crockpot) pour in the green enchilada sauce, drained and rinsed white beans, drained and rinsed black beans, and fat-trimmed boneless skinless chicken thighs or breasts (or rotisserie chicken).
-
Add the undrained diced fire-roasted green chiles, diced tomatoes (if desired, it’s great with or without them), chili powder, cumin, paprika, about 1 teaspoon salt (I prefer seasoned salt), about 1/4 teaspoon pepper, coarsely chopped fresh cilantro, and chicken broth or stock.
-
Cover and cook on low for 5-7 hours or high for 3-5 hours or until the chicken easily shreds.
-
Remove the chicken from the crockpot and place in another bowl (If using rotisserie chicken, this step does not apply, nor does step 6). Add softened cream cheese (cube into smaller pieces and melt in the microwave) into the crockpot.
-
Cover and cook on high for another 30 minutes or until the cream cheese melts completely and is easily stirred into the soup. Remove the chicken and transfer to a bowl. Briskly whisk to get the cheese completely incorporated.
-
Shred the chicken with 2 forks and then add back into the soup.
-
Serve with desired toppings. I love a big handful of pepper-jack cheese, fat-free sour cream, a wedge of lime, and some cilantro!
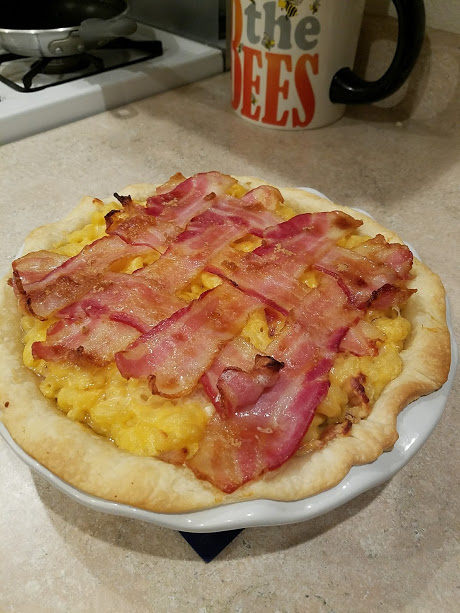
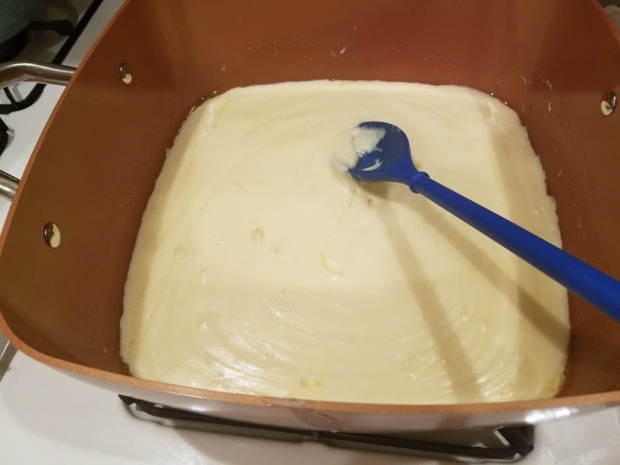
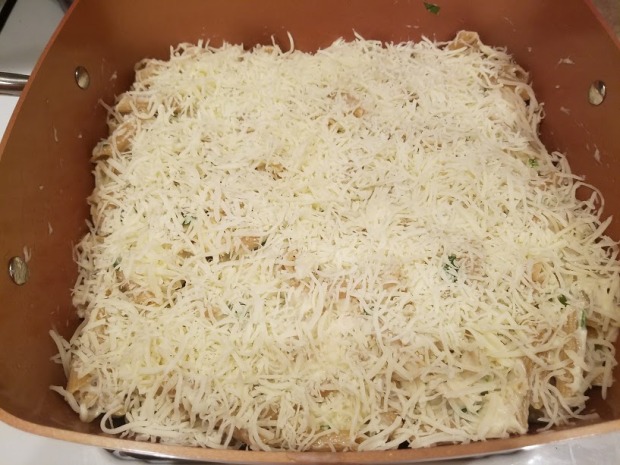
Mac N Cheese with Bacon Pie
Ohhh Facebook and your videos without recipes!! OK, so I had to make this up a bit as I cooked. I prefer a recipe so this scared me a little bit! It turned out so tasty!! Again, this is not diet food haha!
INGREDIENTS
For the crust – Once upon a time, I thought it was irresponsible of me to not be able to make a good pie crust. Well, turns out, I’m terrible at it no matter how hard I try. Pillsbury saves me every time.
For mac ‘n’ cheese filling
5 slices of bacon, cut into 1-inch pieces (I thought ahead and made extra at breakfast. Turned out to be a great time saver!!)
4 cups dried macaroni
4 Tbsp. of butter (½ a stick)
4 Tbsp. flour
2.5 cups heavy cream
2 tsp mustard powder
1.5 pound grated cheese — an equal parts mixture of gruyere, cheddar, Velveeta (yes, I understand that I put in a $7 per 1/2 pound block of gruyere with processed cheese food, but it was delicious-don’t knock it until you try it!)
Kosher salt and freshly ground black pepper
For the bacon lattice
8 slices bacon
1 Tbsp. brown sugar
For mac ‘n’ cheese filling
1. Boil pasta in generously salted water until just al dente, following directions on package.
2. Cook bacon pieces in sauté pan until just crispy, drain on paper towels and set aside.
3. In a large pot, melt the butter. Then stir in the flour. Whisk to combine and cook for 1-2 minutes. Now you’ve got what is called a “roux” — equal parts butter and flour cooked together. Add the cream and whisk again, let cook, whisking occasionally, for 5-10 minutes until it thickens. Now you’ve got bechamel sauce.
4. Add mustard powder and whisk to combine.
5. Add all the cheese and stir to combine. Season with salt and freshly ground pepper.
6. Add macaroni and cooked bacon pieces to cheese sauce, then add more freshly ground pepper to taste.
To assemble
1. Preheat oven to 425°F.
2. Fill the baked pie crust with the mac ‘n’ cheese. You’ll use all but 1 or 2 cups.
3. Weave a lattice with 8 bacon slices (4 in one direction and 4 in the other direction — keep them long as long as possible because they will shrink when they cook).
4. Using your fingers, spread brown sugar on the strips of bacon, then put in a 425°F oven for 15 minutes or until the bacon is cooked. Serve warm.
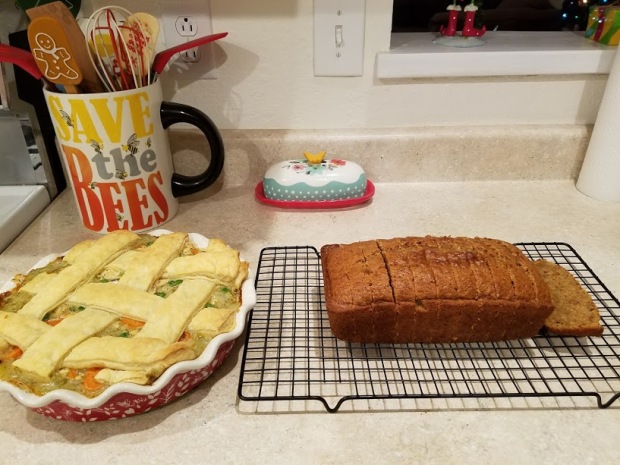
Puffed Pastry Chicken Pot Pie and Banana Bread
Turns out this is not my favorite Chicken Pot Pie (I suppose I should blog about my failures too!). More on that later. This is my favorite banana bread recipe and it’s super easy!!
COPYCAT STARBUCKS BANANA BREAD RECIPE
- 2 cups flour
- 1 teaspoon baking soda
- ¼ teaspoon salt
- 1 egg
- 1⅛ cup sugar
- ½ cup vegetable or canola oil
- 2 tablespoons buttermilk or milk (I make my buttermilk by adding lemon juice or vinegar to the regular milk -just a dash with only 2 tablespoons)
- ½ teaspoon vanilla
- 3 bananas mashed very well
- ½ cup chopped walnuts (optional, but I prefer pecans)
- Preheat oven to 325 degrees.
- Add flour, baking soda and salt to a small bowl and set aside.
- Mix egg, sugar and oil and stir until well combined
- Add the dry ingredients to the wet and stir well. The mixture will be thick and dry.
- Next add milk, vanilla and bananas and stir until incorporated.
- Mix in walnuts and pour into a loaf pan.
- Cook 50-75 minutes, checking regularly until a knife comes out clean.
And now for the Puff Pastry Chicken Pot Pie. I’d picked up a pack of Puff Pastry because I’d really been wanting to cook with it. If I use it for pot pie again, I will use a regular pie crust instead of the Puff Pastry. It was impossible to cut on the bottom. Great taste on top but too much with it on the bottom too. I thought it had too much parsley (not that it made it taste bad, I just thought it was ugly and I like my food to be pretty and pleasing to the eye!).
RECIPE
INGREDIENTS
-
1 package (17.3 ounces) Pepperidge Farm® Puff Pastry Sheets, thawed
-
1/3 cup butter
-
4 medium carrot, peeled and sliced (about 2 cups)
-
3 medium onion, chopped (about 1 1/2 cups)
-
8 ounces mushrooms, sliced (about 3 cups)
-
1/3 cup all-purpose flour
-
3 1/4 cups Swanson® Chicken Broth or Swanson® Chicken Stock
-
1 tablespoon Dijon-style mustard
-
1 teaspoon dried thyme, crushed or 1 tablespoon minced fresh thyme leaves
-
1/2 teaspoon ground black pepper
-
3 cups cubed boneless, skinless chicken breasts, cooked
-
1 cup frozen peas, thawed
-
1/4 cup chopped fresh parsley
DIRECTIONS
- Heat the oven to 400°F. Unfold 1 pastry sheet on a lightly floured surface. Roll the pastry sheet into a 12-inch square. Press the pastry into a 2-quart round casserole. Trim the excess pastry. Prick the pastry thoroughly with a fork. Place aluminum foil onto the surface of the pastry.
- Bake for 25 minutes. Remove the aluminum foil.
- Heat the butter in a 12-inch skillet over medium heat. Add the carrots, onions and mushrooms and cook for 5 minutes or until the vegetables are tender-crisp, stirring occasionally. Add the flour and cook and stir for 3 minutes or until the flour is golden brown. Slowly stir in the broth and heat to a boil. Cook and stir until the mixture boils and thickens.
- Stir in the mustard, thyme, black pepper, chicken, peas and 3 tablespoons parsley. Remove the skillet from the heat.
- Unfold the remaining pastry sheet on a lightly floured surface. Cut the pastry sheet crosswise into 6 (1 1/2-inch thick) strips.
- Spoon the chicken mixture into the casserole. Weave a lattice pattern over the filling with the pastry strips. Trim any excess pastry. Sprinkle with the remaining parsley. Place the casserole onto a baking sheet.
- Bake for 45 minutes or until the filling is hot and bubbling and the pastry is golden brown.
Copycat Applebee’s Cheese Chicken Tortilla Soup Recipe (No Picture-What was I thinking??)
INGREDIENTS
- 1medium yellow onion, chopped
- 2teaspoons fresh garlic, minced
- 2teaspoons vegetable oil
- 4cups chicken stock
- 1⁄4cup chopped green pepper (optional) – I don’t like a chunky soup so I forgo this)
- 1(15 ounce) can tomato puree
- 1teaspoon finely minced jalapeno pepper (No jalapeno? Just add a bit more hot sauce)
- 1⁄2teaspoon salt
- 1⁄4teaspoon pepper
- 1teaspoon sugar
- 1teaspoon chili powder
- 1teaspoon Worcestershire sauce
- 1⁄2teaspoon hot sauce (optional) – So I read this wrong once and added almost 1/2 cup and it was hot, good, but hot!
- 4teaspoons flour
- 1⁄2cup water
- 1lb cooked chicken, cubed
- 1cup cream
- 1⁄4cup fat free sour cream
- 8ounces processed cheese, 1-inch cubes (ahh, yet another use for Velveeta!)
- 10(6 inch) corn tortillas, 1/4-inch strips, fried
- fresh cilantro, roughly chopped (optional)
- Sauté oil, garlic and onions in large pan or Dutch oven until soft.
- Add ingredients 4 through 13. Bring to low boil, then reduce heat and simmer 20 minutes.
- Cut tortillas into 1/4-inch strips and fry in oil or spray with oil and bake at 400ºF (while soup is cooking). Sprinkle with salt if desired.
- Thoroughly mix flour and water, then whisk into soup. Bring to a low boil, then simmer 5 minutes.
- Add chicken and simmer 5 minutes.
- Stir in sour cream and cheese (more or less of each, depending on taste). Ensure 165ºF serving temperature.
- After serving soup, pile tortilla strips into a “haystack” shape on top of the soup.